Further to my comment re. a lane change plate, a friend had recently bought a
3D printer and was looking for something to make. So last night I drew it up,
this morning he wrote the program and made one and before lunch I had it working.
It works perfectly and I think it would make track building easier and lane changing
100% reliable. AS you can see, it's just a flat plastic plate but it ensures that
everything is in the right place!.
Embeding the metalplates when using the 'Keld-dremel-method'
Re: Embeding the metalplates when using the 'Keld-dremel-met
Lane change locator plate
- Attachments
-
- Lane change plate 005.JPG (175.96 KiB) Viewed 14930 times
Re: Embeding the metalplates when using the 'Keld-dremel-met
oohhh. I like. Definitely would make things easier. Thinking of selling them?
-
Kellerkind

- Posts: 35
- Joined: Fri 29. Nov 2013 22:34
- Location: Neustadt Southwest Germany
Re: Embeding the metalplates when using the 'Keld-dremel-met
Good morning and a happy New Year to all of you!
Thanks for this idea, Wes. Looking good. The plasticplate could be even smaller to save material. Started to experiment with a router to get a correct depth for the plate. It seems to work fine but I have to take some photos before posting and discussing.
Regards Jens
Thanks for this idea, Wes. Looking good. The plasticplate could be even smaller to save material. Started to experiment with a router to get a correct depth for the plate. It seems to work fine but I have to take some photos before posting and discussing.
Regards Jens

-
Kellerkind
- Posts: 35
- Joined: Fri 29. Nov 2013 22:34
- Location: Neustadt Southwest Germany
Re: Embeding the metalplates when using the 'Keld-dremel-met
Hi fellows,
didnt give up yet. After learning a lot about the needs of placing the metalplates in an accurate way I was searching for a better solution than the one I described before. It seems to be a promising one I think. You might watch yourself. I am very interested in your opinion, especially please tell me if I made mistakes.
Here we go:
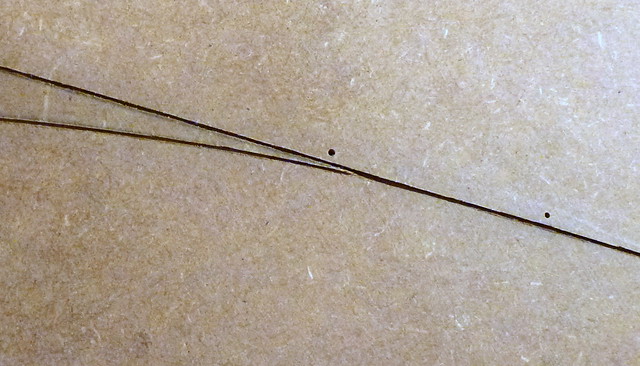
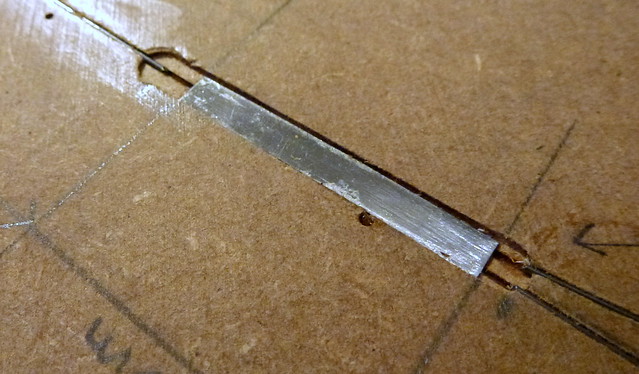
This is our testarea. Gaps for wire (original 0.7mm pianowire from Wes) already dremeld like described in Kelds thread.
The metalplates are 35mm long and our initial point is were the 'exitwires' are exactly 2mm apart from each other.
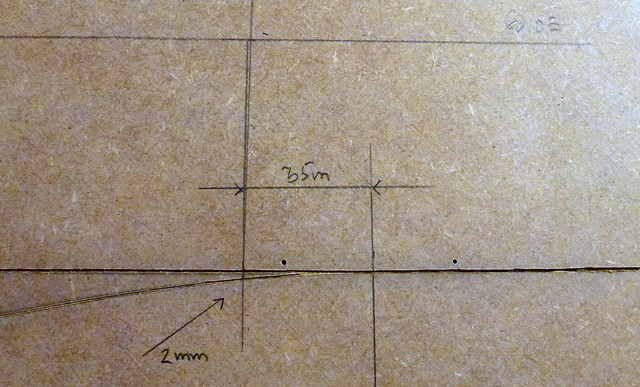
This time I would like to use a router to get a flush base to embed the metalplates in the right depth.
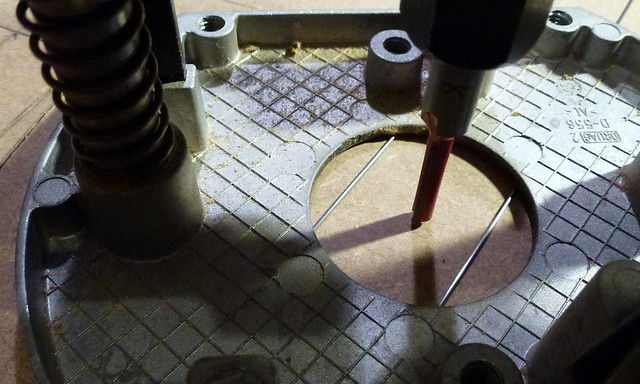
I use a 5mm routerbit. The right depth can easily be found when placing the router on two of the pianowires, then pushing down routingmachine and lock. Depth then exactly will be 0.7mm after routing. Use a guide; freehand routing never worked in my case.
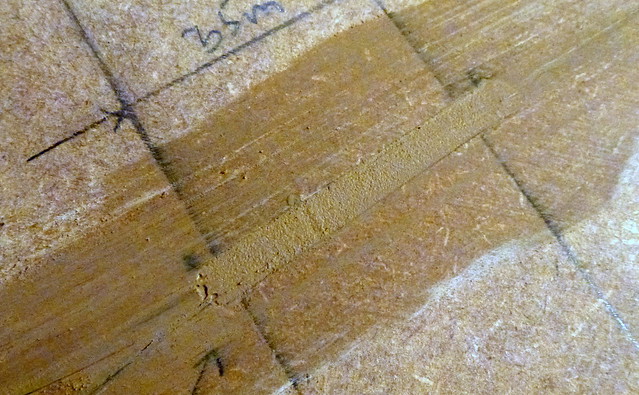
Here is what we get:
In the background you can see the guide.
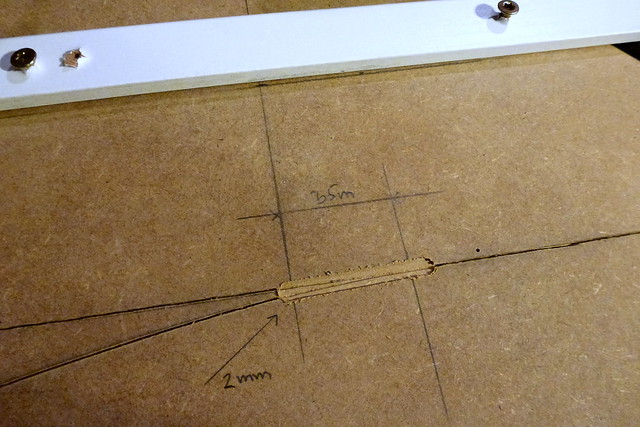
Glued in with some cyanoacrylate adhesive the thickness of the glue can remain unattended.
Watch how flush it is set at place:
In the photo above you can see the wires are already fixed. Underside of the wires is exactly same level like underside of metalplates.
Just some little filler (Still wet in the photo) and it should work.
What do you think? All thoughts and ideas welcome!
Regards Jens
didnt give up yet. After learning a lot about the needs of placing the metalplates in an accurate way I was searching for a better solution than the one I described before. It seems to be a promising one I think. You might watch yourself. I am very interested in your opinion, especially please tell me if I made mistakes.
Here we go:
This is our testarea. Gaps for wire (original 0.7mm pianowire from Wes) already dremeld like described in Kelds thread.
The metalplates are 35mm long and our initial point is were the 'exitwires' are exactly 2mm apart from each other.
This time I would like to use a router to get a flush base to embed the metalplates in the right depth.
I use a 5mm routerbit. The right depth can easily be found when placing the router on two of the pianowires, then pushing down routingmachine and lock. Depth then exactly will be 0.7mm after routing. Use a guide; freehand routing never worked in my case.
Here is what we get:
In the background you can see the guide.
Glued in with some cyanoacrylate adhesive the thickness of the glue can remain unattended.
Watch how flush it is set at place:
In the photo above you can see the wires are already fixed. Underside of the wires is exactly same level like underside of metalplates.
Just some little filler (Still wet in the photo) and it should work.
What do you think? All thoughts and ideas welcome!
Regards Jens
-
Kellerkind
- Posts: 35
- Joined: Fri 29. Nov 2013 22:34
- Location: Neustadt Southwest Germany
Re: Embeding the metalplates when using the 'Keld-dremel-met
Hello everybody,
first lanechangers build like this are really very reliable. Two little questions:
1. I found out by surprise that the reliability of the LC gets best if the 'entrancewire' is straight in line with the 'straighton exitwire' (At least I didnt know about this item). If it just is oriented a little bit towards the 'turnlanewire' malefuction seems to be more common. Is this a fact that needs to be cared for or is it just coincidence?
2. In Wes sketch from above there is a hint that size of the gap between 'entrancewire' and metalplate might be larger than 3mm in some cases. Does it have to be bigger when speed is higher or when it is slower?
Thanks for your help in advance. Regards Jens
Re: Embeding the metalplates when using the 'Keld-dremel-met
Hi Jens, Sorry for the late reply. Re. space between wire and l/c plate, a larger gap makes
lane changing easier at speed but set up we recommend should be ok for all speeds. If the
gap is too large, a slow car will turn too much and miss the exit wire. As you say, the 'in wire'
must be exactly in line with the straight on default wire.
lane changing easier at speed but set up we recommend should be ok for all speeds. If the
gap is too large, a slow car will turn too much and miss the exit wire. As you say, the 'in wire'
must be exactly in line with the straight on default wire.
Re: Embeding the metalplates when using the 'Keld-dremel-met
Further to my photo of the 3d printed l/c guide plate, I bought some new lightweight plaster to repair my house wall recently and tried it out on the test l/c section with excellent results. Very easy to use,
there seems to be no shrinkage and the colour is about ok without paint.
there seems to be no shrinkage and the colour is about ok without paint.
- Attachments
-
- Lane change hint 006 (640x456) (500x356).jpg (129.72 KiB) Viewed 14817 times
Re: Embeding the metalplates when using the 'Keld-dremel-met
The wire that Wes sells is .028" in diameter. The lane change plates I received from him are .010" thick. Assuming both are glued down on the baseboard, that suggests that the top of the LC plate should be .018" lower than the top of the wire. If the wire is embedded in a groove/slot, should the top of the LC plate be .018" below the surface of the baseboard or flush with the surface of the baseboard, and hence at the same level as the top of the wire? I'm planning to use 12" pieces of straight .035" diameter piano wire, glued into a groove .035" wide and .037 deep. I plan to use a Dremel tool with router attachment and .035" fish-tail router bits to cut the grooves. I expect the wire to be flush with the top surface of the baseboard when finished.
Ned
Ned